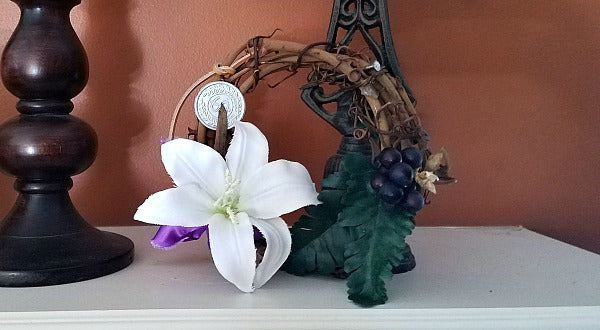
We didn't always homeschool. My daughter went to a Christian school until 3rd grade and I was a dedicated room mom helping plan holiday parties and school events. Her class had a wonderful group of moms who always tried to make every party special and meaningful for the kids.
One of our goals was that the kids would be able to make a craft that not only was fun to create, but that would serve as a remembrance of the meaning of the holiday or event we were celebrating. Looking back, the Easter wreath was my favorite.
Make An Easter Wreath
The Easter wreath is more than a craft. It is an Easter object lesson. Each piece tells a part of the Easter story. Gather your supplies and then tell the story of each object either before you put the wreath together or during assembly. This will give your child something tangible to touch and feel the Easter story.
The Supplies
- grapevine wreath
- nail
- plastic coin
- silk lily
- plastic grapes
- purple ribbon
- hot glue gun or other strong adhesive (e6000 for example)
The Lesson
Lay all the supplies in front of the student. Each object represents a part of the Easter story. As you talk about each one, have the student hold that object in their hand.
Wreath - The wreath itself represents the crown of thorns that was placed on Jesus' head by those who were crucifying him. They did this to mock his title that many gave him "King of the Jews".
Coin - The coin represents the 30 pieces of silver that Judas Iscariot was paid by the chief priests to betray Jesus.
Purple ribbon - Purple is the color of royalty. The purple ribbon represents the purple robe placed on Jesus by the soldiers who were beating and mocking him.
Nail - The nail represents the nails that were used to nail Jesus' to the cross during the crucifixion.
Grapes - The grapes represent the Last Supper and the cup of wine that symbolizes the blood Jesus shed for us on the cross.
Lily - The lily represents new life and Jesus rising from the dead.
Assemble your wreath
Be careful when assembling your wreath. Hot glue and quick dry, strong adhesives work the best to hold the object onto the wreath. Help your children through this process.
Add the objects to your wreath in whatever pattern you wish. You can either assemble the wreath as you discuss the symbolism of each object or after the lesson.
Place your wreath on your mantle, door, wall, or shelf each Easter season to remind us of the price Jesus paid for our sins and the promise of new life through his blood.
More Easter Activities
10 Awesome Easter Object Lessons - Homeschooling Today
The Art And History Of Decorating Eggs - Homeschooling Today
Crown Of Thorns Chalk Pastel Tutorial - HodgePodge
No Mess Easter Egg Coloring - Our Good Life
Serving Others This Easter - Raising Lifelong Learners
Easter Unit Study Ideas - The Homeschool Scientist